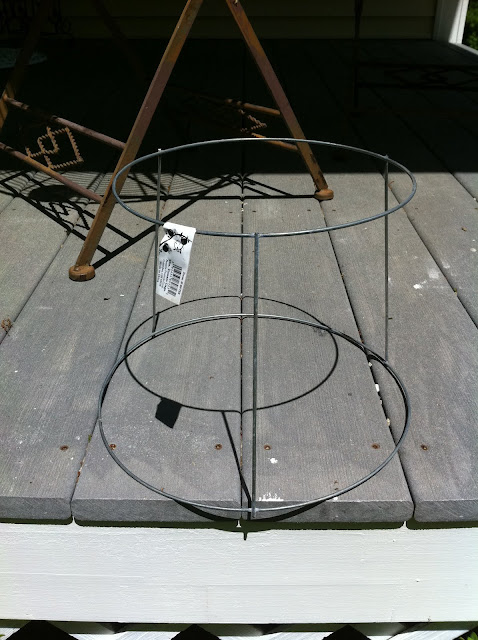
and this is a stock photo because in my eagerness to start, i forgot to take a photo of the cage. this is the one i used.
i've had a chicken wire basket on my mind (sorta like a devil's haircut, but not really) for the past two weeks. i kept looking for large gauge wire that i could fashion into a basket, but to no avail. then, the other afternoon i was at my inlaws and walked past two tomato cages on the ground near their shed. perfect shape for a basket. today i left the mister to finish up the porch ceiling (yay! it's done, it's done!) and i went to the hardware store to get one thing. a tomato cage. everything else i had on hand. so this little project cost me under $3.
gather your supplies, work gloves (a must! if you want to protects your skin) a bolt cutter or heavy duty wire snips, a needle nose pliers and some chicken wire (don't ask how much, i have no idea, we had a roll hanging around in the garage). safety glasses would be smart, but i took my chances, only once hearing my mother's voice saying 'you'll take an eye out with that!'.
the tomato cage wire is pretty hard, so if you're not really strong, you may want to get someone strong to snip it for you. since i had my big, strong, manly man snip the wire for me while i was telling him where to snip it, i didn't take photos of that either, but, for purposes of illustration, use the above as a guide. see those green wires? snip at the circle where the arrows indicate and you will be left with a base like this:
turn the frame over so the bottom is on the top, center your chicken wire on top and start to wrap the end pieces of wire around the tomato cage base, using your gloved finger at first, then using the needle nose pliers to twist it further around the base. try to keep your ends to the inside of the basket, so there are no sharp points sticking out. once you've wrapped the entire piece of chicken wire, you can go back with a wire cutter and cut the ends close to the base.
when you're all done, the bottom will look like this:
now bring your newly bottomed basket over to the roll of chicken wire, and cut another manageable piece, this time just bigger than the height of the basket and a little wider than the distance between the middle supports. get wrappin', same as the bottom. because the basket tapers, you will have a little more chicken wire toward the bottom, just trim it away with your wire cutter, leaving enough to wrap around the supports. again, try to keep the ends to the inside of the basket and snip away at the end.
repeat this process for the remaining sides and you have a new basket!
i had so much fun making this that i made two. one i made a handle for (out of a 5/8" wooden dowel and coat hanger wire) and spray painted white.
this was really a quick project, i made two baskets in about an hour and a half and only drew blood twice! be careful, the chicken wire,when cut, is sharp! i will also mention that this basket is best suited for outdoors, as the bottom may scratch your table.
so tell me, what was the last thing you couldn't wait to make?
linking up to:
my simple country living


Now this is a pretty cool. Thanks for sharing!
ReplyDeleteAbsolutely love this! Am making this today I think!
ReplyDeleteKim@reposhture.blogspot.com
Contact me this item for buy readymade=malamsaifi972000@gmail.com
Delete9720001857
I love this too. Thank you for providing such good instructions. I have a while yet before I NEED this, my chicks are less than 2 months old yet, but I am certainly going to make one before I need it. Thanks again.
ReplyDeleteOh, I LOVE it!! Want. That is all.
ReplyDeleteXO
Hi, McVick
ReplyDeleteThis is awesome! I just love how it turned out.
Vanessa
Featured your basket on this weeks SOS!
ReplyDeletehttp://www.nutmegplace.com/2012/05/show-off-saturday-13.html
LOVE it!!
XO
Too cute!!! I might have to make me one of those....
ReplyDeleteNice! Way to be resourceful with the tomato cage! Don't you love it when you get an epiphany moment like that?! I'd totally love to make one, but you make me concerned for scratching anything...
ReplyDeleteGlad you still have your eyes...awesome country basket!
ReplyDeleteKimmie
mama to8
One homemade and 7 adopted
What a fabulous project and a great tutorial!
ReplyDeleteKathy, what a great project. I've used the tomato cages for other projects before. I have been wanting to make Lamp Shades with chicken wire. You gave me a great idea for the lamp shades. I'll just make additional wiring for the top of the lamp shade. Why didn't I think of using the tomato cages for this new project before. With a really large tomato cage I may make an outdoor solar lamp shade for under my large trees. Luv, Luv, Luv, your idea.
ReplyDeleteI can make it in the basket
ReplyDeleteContact me=9720001857
E-mail=malamsaifi972000@gmail.com
Contact me=malamsaifi972000@gmail.com
ReplyDeleteThis basket make it